How to Make Sushi at Home: Step-by-Step Guide & Expert Tips
There’s something endlessly fascinating about transforming a handful of simple ingredients into elegant, artful morsels bursting with flavor and tradition. Honestly, making sushi at home felt intimidating to me for years—maybe it does for you, too? Between the mythical “perfect rice,” the tight seaweed roll, and more sushi-fail photo galleries than I care to admit scrolling through, I just assumed sushi was best left to the pros. But curiosity finally won out. I dove in (messy hands, anxious knife skills, skeptical family in tow) … and now, homemade sushi nights have become one of our best-loved rituals. Let me clarify right up front: You do not need to be a master chef, nor do you need a thousand-dollar knife set, a magical rice steamer, or even raw fish to enjoy incredible sushi at home. What you do need is a dash of curiosity, an appetite for fun, and a willingness to learn (and, trust me, laugh at yourself a few times).
I want this guide to demystify the sushi-making process, honoring its Japanese roots while sharing every tip and mistake I’ve picked up through trial, error, and way too many sticky fingers. So whether you’re prepping for your first-ever sushi night or aiming to sharpen your rolling technique for the umpteenth time, you’ll find real, practical insight here—no pretense, just a genuine human trying, learning, and enjoying the process. From choosing, rinsing, and seasoning rice, to assembling the right fillings, getting the roll nice and tight, and slicing without squishing, I’ll walk you through it all. In my view, the joy is in both the doing and the eating—but the eating does win out in the end!
Why Make Sushi at Home? The Emotional, Practical, and Creative Rewards
Ever felt that tingle of excitement when you tackle a dish at home you’d usually order out? That’s what homemade sushi is all about for me. Sure, it started as a way to save money (sushi nights out add up fast, especially with hungry teens!), but it quickly became this beautiful mix of ritual and creativity. Here’s the thing: homemade sushi is more than food. It’s sharing skills with friends, teaching the kids about Japanese culture, even a little friendly competition for the best-looking roll. Plus, you control every detail: from the freshness of your ingredients to the exact spiciness of your sriracha mayo drizzle.
My Early Sushi Mishaps (And What I Learned)
Confession: My first homemade sushi roll? It was a total disaster. The rice was gluey, the nori (seaweed sheet) tore, and—no joke—I accidentally used the paper side of the bamboo mat, which stuck everywhere. It’s embarrassing, but it’s also what taught me the fundamentals I’ll share here. Learning how to make sushi at home is less about following rules perfectly and more about understanding the “why” behind each step. For instance, the first time I rinsed rice “until the water ran clear,” I had no clue why; now I know it helps prevent overly sticky, heavy rice that ruins even the prettiest roll1. That single insight alone improved every batch I made afterward. I’ve adapted my kitchen setup—fewer tools, better organized, and never skipping the step of wetting my knife before slicing. Small tweaks, big difference.
“The beauty of sushi is in its simplicity—fresh ingredients, careful technique, and creative expression. At home, you can experiment fearlessly. That’s where the true joy lies.”
In Japan, sushi is often considered an everyday food, not just restaurant fare. Convenience stores sell freshly made rolls (called makizushi) for quick lunches—a tradition that’s helped inspire homemade sushi’s global popularity.
Essential Sushi Tools and Ingredients: What You Really Need (and What’s Optional)
Looking at online sushi recipes can be overwhelming—so many gadgets, specialty knives, obscure Japanese terms! Here’s what I keep on hand for every sushi night, and what I feel confident is nonessential. Let’s break it down for busy kitchens:
| Tool/Ingredient | Purpose | Must-Have? | My Tip |
|---|---|---|---|
| Rice Cooker | Cooks sushi rice evenly | No, but handy | A heavy-bottomed pot works fine; watch carefully! |
| Sushi Mat (Makisu) | Rolls sushi tightly | Yes | Wrap it in cling film for easy cleanup |
| Sharp Knife | Slicing rolls & fish | Yes | Wet the blade with water between slices |
| Bamboo Paddle | Mixing rice | No | Use a wide spatula or wooden spoon instead |
| Japanese Short-Grain Rice | Sushi’s base—texture/flavor | Yes | Look for “sushi rice” on the package |
Don’t let missing specialty gadgets stop you. The most important tools? Your own hands, some patience (seriously), and the willingness to mess up a little at first.
The Secret: Sushi Rice Preparation (And the Science Behind It)
If you take away nothing else, let it be this: the heart of great sushi at home is exceptional rice. Not just sticky rice, but seasoned, short-grain Japanese rice that’s fluffy yet cohesive, barely vinegared, and subtly sweet. I avoided this for too long out of fear—turns out, once I stopped guessing and followed a few science-backed steps, my sushi rice went from dense clumps to restaurant-adjacent perfection. Here’s what really matters:
- Rinse thoroughly: Wash your sushi rice under cold water until the water runs clear—at least three or four rinses.
- Rest before cooking: Soak the washed rice for 20-30 minutes. Resting allows the grains to hydrate evenly and avoids the dreaded undercooked center3.
- Cook with exact water ratio: Check your rice packaging for guidance, but generally 1:1.1 or 1:1.2 (rice to water by volume) is ideal for sushi rice. Too much water and you’ll end up with mush!
- Season while hot: As soon as the rice is cooked, fold in sushi seasoning (rice vinegar, a touch of sugar and salt) in a wide, shallow bowl for quickest cooling. Fan the rice to add sheen (yes, fanning makes a difference—a trick I learned from a Japanese chef’s demo).
- Let cool to room temperature: Never roll sushi with hot rice—trust me, it’ll warp your nori and melt fillings. Give it at least 30 minutes.
“Nailing the rice texture is 80% of the battle in sushi-making. Even accomplished chefs practice rice preparation for years—a few careful steps can make your home sushi unforgettable.”
Choosing and Prepping Sushi Fillings: Classic and Creative Options
Okay, let’s bust a myth right here: You do not need raw fish to make spectacular sushi at home. In fact, some of my favorite rolls feature cooked shrimp, smoked salmon, pickled veggies, or even lightly seared proteins. Safety-wise, unless you’re sourcing “sushi grade” fish from a reputable supplier (and keeping it cold and clean), start with cooked or plant-based fillings.
- Traditional Fillings: Cucumber, avocado, cooked eel (unagi), boiled shrimp, imitation crab, grilled egg (tamago), pickled radish (takuan), and fresh vegetables like carrots or scallions.
- Creative/Fusion Fillings: Cream cheese, spicy canned tuna, roasted red pepper, mango, jalapeño, grilled tofu, smoked salmon.
- Vegan Sushi Ideas: Marinated shiitake mushrooms, sweet potato, roasted beets, asparagus, mango, avocado, and microgreens.
Ingredients should be cut into long, thin strips for even rolling—think “pencil-thin.” Wet your knife to avoid sticky messes. And here’s a quick table of trusted fillings for when you want to keep it simple (especially handy for kids or picky eaters).
| Filling | Prep Notes | Vegan? |
|---|---|---|
| Avocado | Slice just before rolling; sprinkle with lemon juice to avoid browning | Yes |
| Cucumber | Remove seeds for less water; cut into matchsticks | Yes |
| Imitation Crab | Flake or slice; available pre-cooked | No |
| Tempura Sweet Potato | Roast for easy prep (skip frying for less mess) | Yes |
| Grilled Tofu | Press & sear; season lightly | Yes |
“You don’t have to follow sushi rules so rigidly at home. Try new combos—just respect the freshness of ingredients, and let your palate guide you.”
Rolling Sushi at Home: Step-by-Step Instructions (With Troubleshooting!)
Now for the best (and sometimes messiest) part: rolling sushi! I still occasionally rip a nori sheet, or end up with an off-centered filling, but let me break down the basic process—plus some fixes I’ve tested over dozens of rolls.
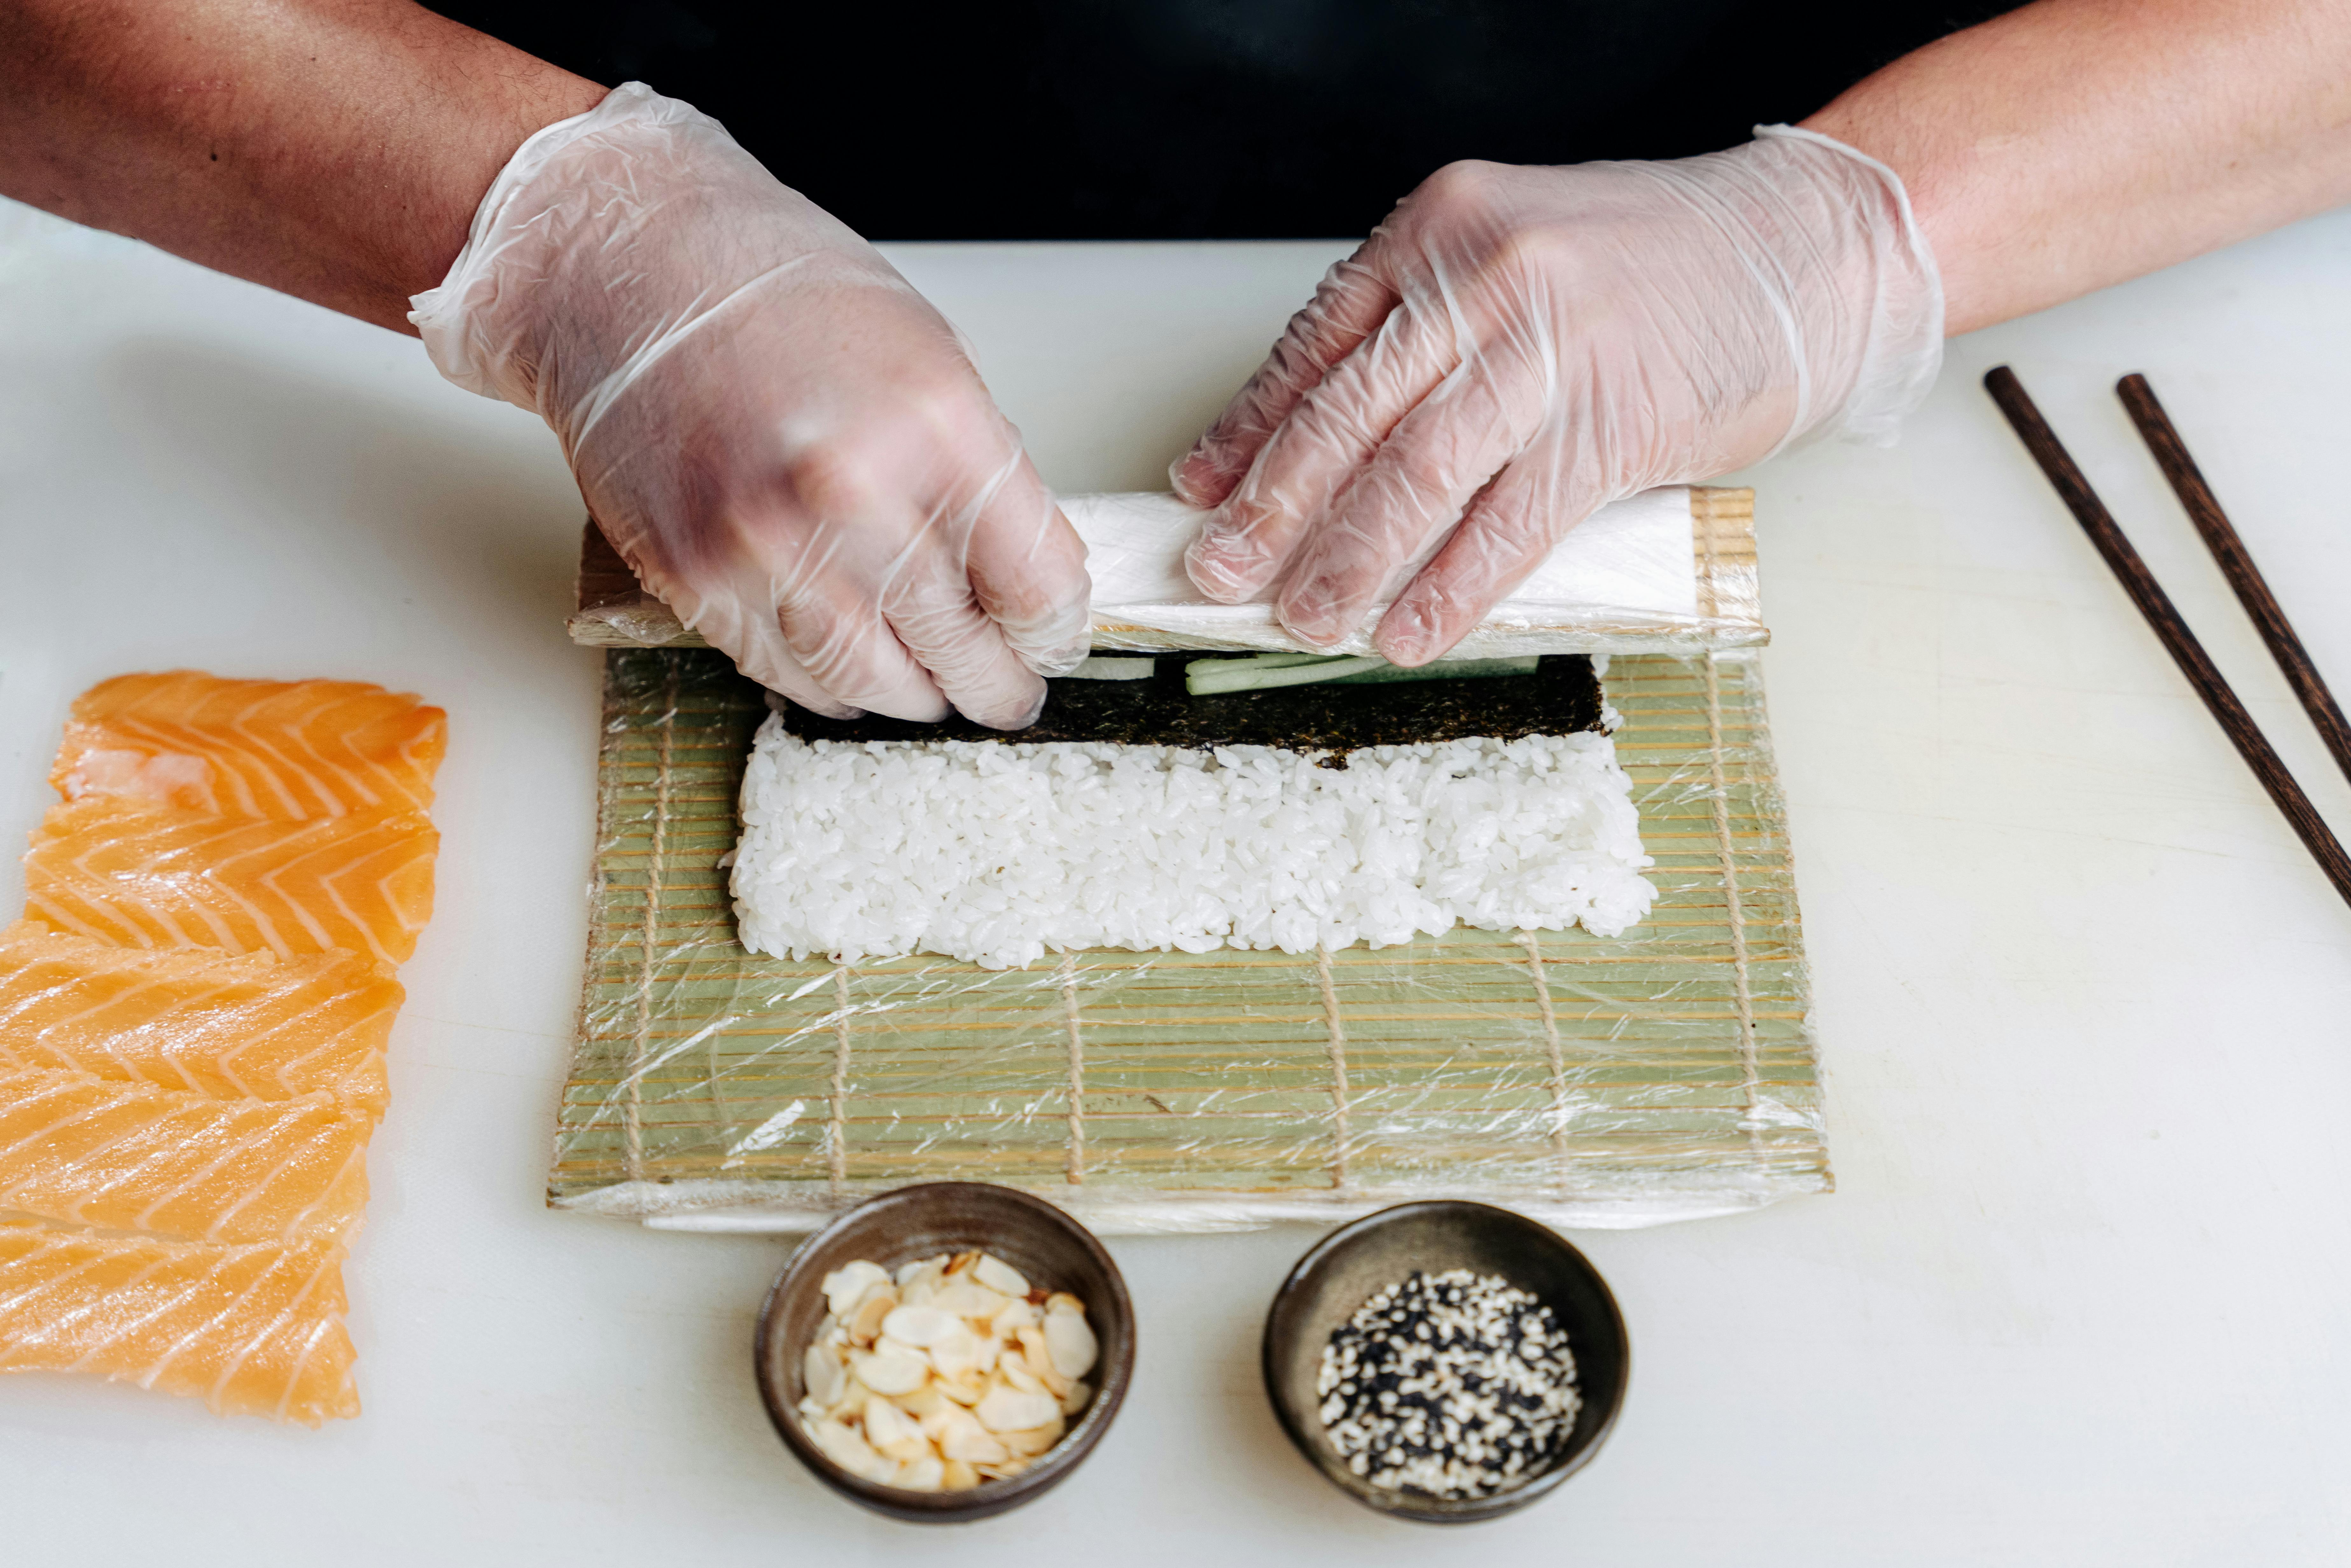
- Lay out bamboo sushi mat (makisu): Wrap it in plastic for easy cleanup and to prevent rice sticking.
- Place 1 nori sheet on the mat: The shiny side goes down, rough side up (I used to do the opposite—nope!).
- Add cool sushi rice: Use damp hands to press a thin even layer, leaving about 1-inch bare at the far edge to “seal” the roll.
- Arrange fillings in a line: Place about 2 inches from the closest edge—don’t overstuff or things bust apart (been there, cleaned that mess).
- Roll tightly, using gentle pressure: Lift the edge of the mat closest to you, guiding it up and over the filling, tucking with your fingers. Pull the mat away as you roll forward, keep pressure even but not forceful. Stop, compress gently, finish rolling to the edge.
- Trim & slice: Use a wet, sharp knife for clean pieces. Wipe your blade between cuts—this alone can change the look of your sushi from “DIY disaster” to Instagram-worthy.
Sushi Troubleshooting & Pro Fixes: Real-World Lessons
Here’s where I’m brutally honest—no matter how many YouTube videos I watched, my first few homemade sushi sessions were a comedy of errors. Rice stuck to everything, my first attempts at “inside out” rolls (uramaki) were ragged at best, and my knife work was, frankly, embarrassing. Actually, let me clarify: the beauty is, you get a little bit better each time. After dozens of batches, here are some fixes and tips that genuinely work:
- Sticky fingers sabotage: Keep a bowl of water and a dash of rice vinegar handy. Wet hands and knife often.
- Loose, falling-apart rolls: Use less rice; compress gently but don’t smash. Don’t overfill with fillings—a thin layer is easier to master, especially early on.
- Ragged edges or crushed slices: Cold, wet knife only—no shortcuts. Some home cooks even use dental floss to slice cleanly when knives are less than pristine! I’ve tried this in a pinch, and it’s surprisingly effective.
- Tough nori: Too dry nori can be briefly heated over a burner (carefully—they burn in seconds) to restore flexibility.
- Bland taste: Amp up your vinegar seasoning or add a dash of furikake (Japanese seasoning blend) for instant flavor.
Let that sink in for a moment. None of these problems are unique—they’re part of learning something new in the kitchen. Each roll is its own mini lesson. I used to worry so much about “wasting” ingredients. These days, I view every off-looking roll as edible learning.
Sustainability, Seasonality & Sourcing: Sushi for a Changing World
There’s an important—and often overlooked—conversation about how we source ingredients for homemade sushi. Wild fish stocks face real pressure globally6, and the environmental impact of aquaculture isn’t always “as seen on TV.” I admit, for a while I just grabbed supermarket fish with little thought for provenance; the more I learned, the more I wanted to make choices that align with both flavor and sustainability.
- Seek out sustainable seafood guides: Monterey Bay Aquarium’s Seafood Watch lists (and app) are essential for ethical choices.
- Go big on produce: Celebrate the season—spring asparagus, summer herbs, fall roasted squash, winter pickles. Not every sushi roll needs fish.
- Consider local markets: Seek out community fishmongers over generic supermarket offerings. Chat about freshness and “sushi grade” when possible.
- Reduce waste: Save veggie peels for broth, use leftover rice for onigiri (rice balls) or poke bowls the next day.
“Sushi is a centuries-old food, but its future depends on our daily sourcing decisions. The best home sushi isn’t just delicious—it’s mindful and respectful of ingredients.”
FAQs: Making Sushi at Home
- Do I need a rice cooker? No, but it’s helpful. A quality saucepan with a heavy lid works too.
- Is eating homemade sushi safe? Absolutely, if you use cooked fillings or source sushi-grade fish from a reputable supplier. Always refrigerate fish and consume immediately. When in doubt, go veggie!
- How long does sushi rice last? Best the same day, but you can store rice in a sealed container at room temperature for up to 8 hours. Don’t refrigerate—it hardens!
- Can I make sushi without nori? Try “inside out” rolls with soy wraps or thin omelette sheets—or even molded sushi (temari-style) in a pinch.
- What is the difference between sushi and sashimi? Sushi refers to seasoned rice paired with toppings or fillings (can be fish, veggie, or other), while sashimi is sliced raw fish without rice.
Traditionally in Japan, sushi chefs plate their creations so that you eat with your hands—not with chopsticks. This preserves the fragile structure. At home? Go with whatever feels right.
Quick Reference Table: Sushi Roll Styles Explained
| Sushi Type | Key Characteristics | Common Fillings |
|---|---|---|
| Makizushi (Roll) | Rice and filling rolled in nori | Veggies, seafood, egg |
| Uramaki (Inside-Out) | Rice on outside, nori inside | California roll, spicy tuna |
| Nigiri | Hand-formed rice ball, topped with fish/other | Salmon, shrimp, egg |
| Temaki (Hand Roll) | Cone-shaped, seaweed wrapper | Soft-shell crab, veggie, cooked meats |
Schema Markup for Recipe SEO
To boost your homemade sushi content in search results, implement Recipe schema markup with clear “HowTo” steps and review snippets. This ensures search engines “see” your recipe details, which means more clicks and visible results8.
Final Thoughts: Homemade Sushi as Ritual, Learning, and Connection
Here’s the thing—I used to think making sushi at home had to be an event or an attempt to mimic restaurant standards. Now, quite frankly, it’s more of a recharge. It’s an act of curiosity, care, and creativity in the middle of a busy week. Sometimes my rice isn’t perfect; sometimes the rolls are crooked or the avocado turns brown by the time I plate it up. Actually, that’s all part of why I love it. Each homemade sushi night has its own rhythm and personality.
I’m still learning new tricks and flavors. My kids keep inventing wild roll combos (PB&banana sushi? Don’t knock it until you try it!), and every once in a while, our whole table bursts out laughing at a catastrophic “failed” roll. I’ve learned it’s about the process far more than the presentation. Anyone who’s made sushi at home has a favorite story—and some signature move for rolling, slicing, or topping. If there’s one thing I hope you walk away with, it’s that kitchen joy and delicious messes are part of the journey—not detours.
References & Additional Resources
References