Perfect Biryani Recipe Guide: Master Traditional Techniques
The first time I attempted biryani, I’ll be completely honest—it was a disaster. Rice stuck to the bottom, spices clumped together, and the meat was tough enough to use as a doorstop. That was fifteen years ago, and since then, I’ve been on what I can only describe as a passionate journey to understand this magnificent dish that has captivated food lovers for centuries.
What strikes me most about biryani is how it represents everything beautiful about cooking: patience, technique, cultural heritage, and the magic that happens when simple ingredients transform into something extraordinary. Having worked with home cooks and professional chefs alike, I’ve consistently found that biryani intimidates people more than it should. Yes, it requires attention and respect, but it’s absolutely achievable in any kitchen.
Cultural Heritage Spotlight
Biryani originated in the kitchens of the Mughal Empire, where Persian rice dishes met Indian spices and cooking techniques. The word “biryani” itself derives from the Persian “birian,” meaning “fried before cooking.” Each region of the Indian subcontinent developed its own distinctive style, creating a rich tapestry of flavors that continues to evolve today.
From my experience teaching cooking classes, I’ve noticed that people often think biryani is just flavored rice with meat thrown in. Actually, let me step back for a moment—that’s probably the biggest misconception I encounter. Biryani is fundamentally about layering: flavors, textures, aromas, and cooking techniques that work together in perfect harmony.
Understanding Biryani Fundamentals
Here’s what gets me excited about biryani—it’s simultaneously ancient and modern, simple and complex. The basic principle hasn’t changed in centuries: you partially cook rice, partially cook meat or vegetables, layer them together, and finish cooking using steam and gentle heat. Sounds straightforward, right? Well, the devil’s in the details, as they say.
I remember when this first clicked for me during a visit to Hyderabad. An elderly chef explained that biryani isn’t about following a recipe mechanically—it’s about understanding the rhythm of the ingredients. The rice needs to be cooked exactly 70% through. The meat should be tender but not falling apart. The spices must bloom properly without burning. Each element has its own timing and requirements.
What really strikes me is how biryani represents the beautiful complexity of Indian cuisine. According to culinary historians1, there are over 50 documented variations of biryani across the Indian subcontinent, each with its own unique characteristics and cultural significance.
The technique I’ve found most crucial—and honestly, the one that took me years to master—is the concept of “dum” cooking. This involves sealing the pot and cooking on very low heat, allowing the ingredients to steam together while developing deep, complex flavors. It’s incredibly meditative once you get the hang of it, though I’ll admit I burned my fair share of rice learning this technique.
Ingredient Selection & Preparation
Let me be completely honest about ingredients—quality makes an enormous difference in biryani. I used to think I could cut corners with cheaper rice or substitute spices, but the results were always disappointing. These days, I’m pretty particular about sourcing, and I’ve learned that it’s better to make biryani less frequently with good ingredients than regularly with mediocre ones.
The Foundation: Rice Selection
Basmati rice is non-negotiable for authentic biryani. I’m partial to aged basmati—at least one year old—because the grains separate beautifully and have this incredible nutty fragrance. Here’s something I learned the hard way: not all basmati is created equal. The longer the grain, the better the texture after cooking.
Rice Quality Indicators
- Length: Look for grains that are at least 6.5mm long
- Age: Aged rice (1-2 years) cooks more evenly
- Aroma: Should have a distinct nutty, floral fragrance
- Texture: Grains should feel firm and dry, not sticky
I always soak my rice for exactly 30 minutes before cooking. Some traditional recipes call for longer soaking, but honestly, I’ve found that 30 minutes gives you the perfect balance—enough time for the grains to absorb water without becoming mushy during cooking.
Spice Selection and Preparation
The spice blend is where biryani truly comes alive. I grind my own garam masala fresh for every batch—it sounds excessive, but the difference is remarkable. Research shows that whole spices retain their essential oils much longer than pre-ground versions2, which translates directly to more vibrant flavors in your finished dish.
| Spice | Quantity (per kg rice) | Preparation | Quality Notes |
|---|---|---|---|
| Whole Cardamom | 8-10 pods | Lightly crush | Green pods preferred |
| Cinnamon | 2-3 sticks | Break into pieces | Ceylon over Cassia |
| Bay Leaves | 3-4 leaves | Tear slightly | Should be aromatic |
| Cloves | 6-8 pieces | Use whole | Strong aroma indicator |
One thing I’ve learned through trial and error—and believe me, there was plenty of error—is that saffron quality varies dramatically. Real saffron should be deep red with orange tips, and when you soak it in warm milk, it should release a golden color almost immediately. I’ve been fooled by cheaper alternatives before, and the difference in the final dish is substantial.
Protein and Vegetable Preparation
Whether you’re making chicken, mutton, or vegetable biryani, the protein preparation is crucial. I always marinate meat for at least 2 hours, though overnight is better. The yogurt in the marinade not only adds flavor but also helps tenderize the meat through its natural enzymes3.
For vegetable biryani, I’ve found that different vegetables require different preparation methods. Potatoes should be partially fried until golden, while cauliflower needs to be blanched briefly. The key is understanding that everything should be 70-80% cooked before the final layering and dum cooking process.
This brings up another point that took me years to understand—timing is everything in biryani preparation. I now prep all my ingredients 2-3 hours before cooking, arrange them in order of use, and follow what I call my “biryani timeline.” This systematic approach has eliminated most of the stress and mistakes that used to plague my cooking.
Traditional Cooking Techniques
Now we’re getting to the heart of biryani—the actual cooking process. I’ll be completely honest, this is where I made my biggest mistakes early on. The technique looks simple on paper, but it requires what I can only describe as a feel for the ingredients and timing that develops over time.
The Art of Layering
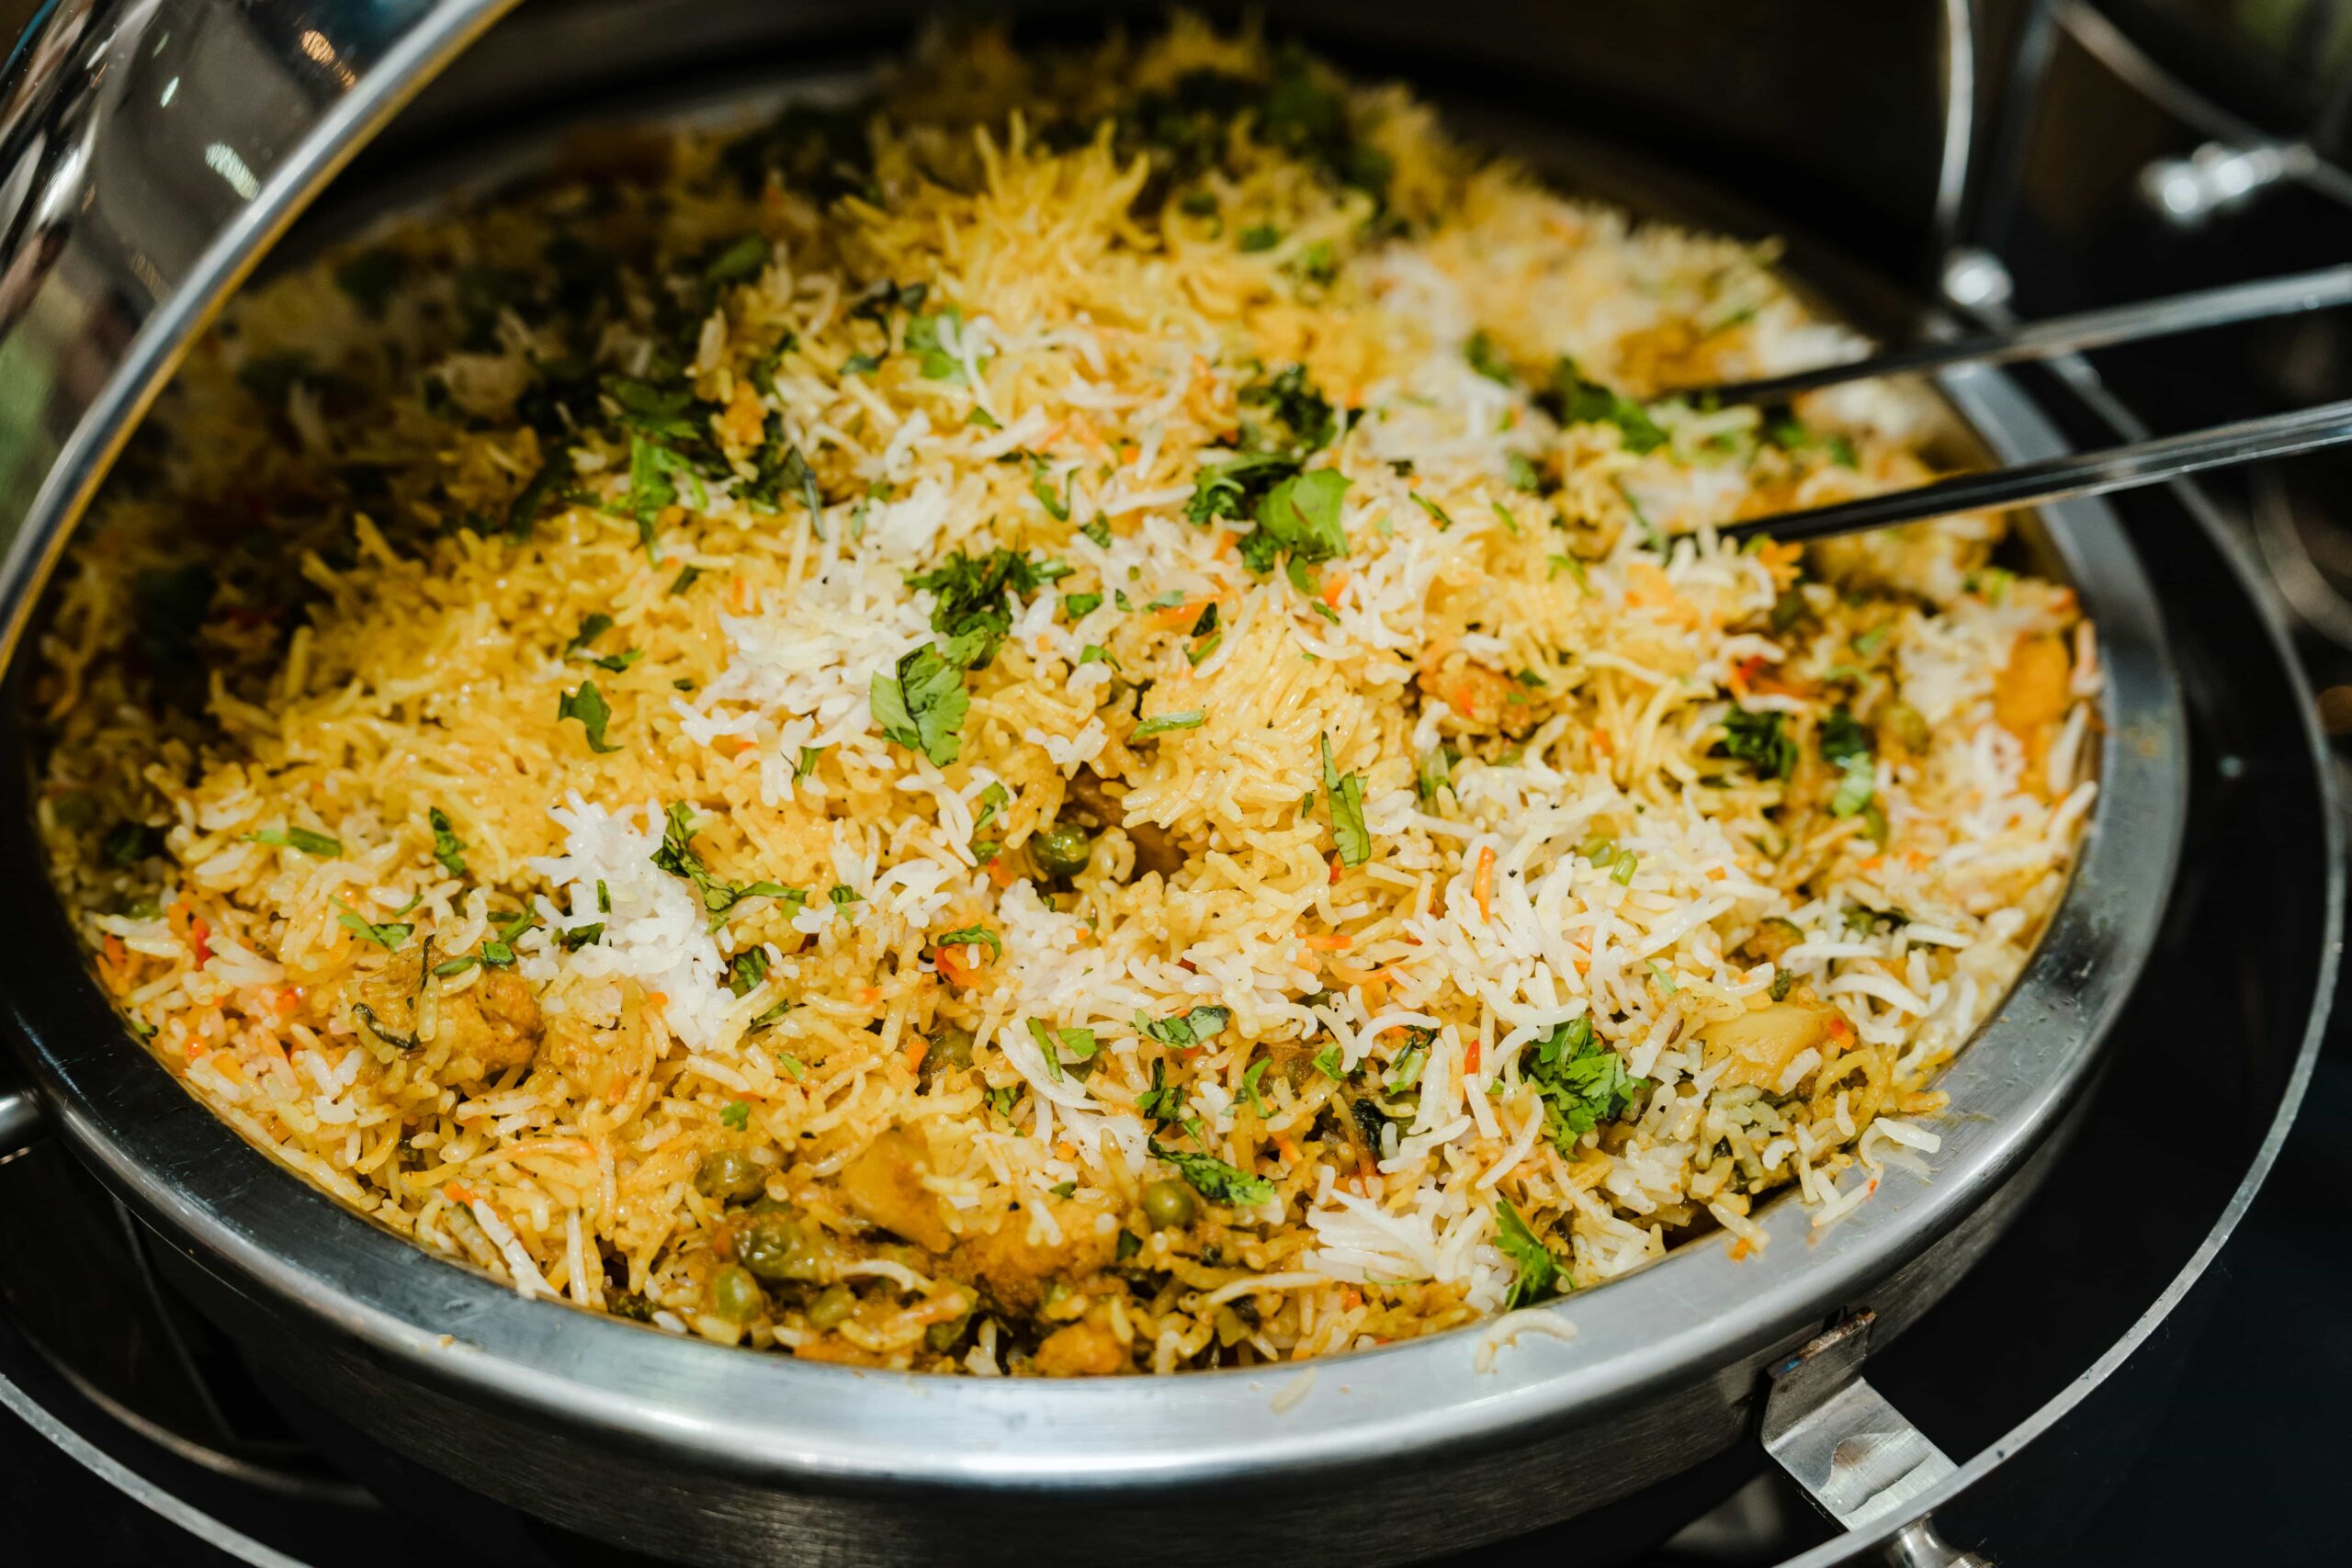
Layering is where biryani becomes magical. I start with a base layer of rice, then add the cooked meat or vegetables, followed by more rice, and finally the garnishes. But here’s the thing—it’s not just about stacking ingredients. Each layer needs to be seasoned properly and arranged with care.
What really struck me during my time learning traditional techniques was how methodical the process is. You don’t just dump ingredients together and hope for the best. Modern research supports this traditional approach, showing that proper layering allows for optimal heat distribution and flavor development4.
- Spread bottom layer of rice evenly
- Add cooked meat/vegetables in center
- Sprinkle fried onions, mint, and saffron milk
- Top with remaining rice
- Final garnish of herbs and aromatics
Professional Layering Tips
Each layer should be seasoned lightly—remember, flavors will concentrate during the dum cooking process. I sprinkle salt, garam masala, and fresh herbs between layers, but sparingly. The goal is building flavor gradually, not overwhelming any single component.
Mastering Dum Cooking
Dum cooking is probably the most crucial technique in biryani preparation, and honestly, it’s where I see most home cooks struggle. The concept is simple: seal the pot and cook on very low heat, allowing steam to finish the cooking process. The execution, however, requires patience and understanding.
I remember my mentor explaining that dum cooking isn’t just about low heat—it’s about creating a controlled environment where flavors can meld and develop without any ingredients overcooking. The traditional method involves sealing the pot with dough, but I’ve found that heavy-duty aluminum foil works perfectly for home kitchens.
Temperature control is absolutely critical. I keep my heat at the lowest possible setting after sealing the pot. Too high, and you’ll burn the bottom layer. Too low, and the rice won’t finish cooking properly. It’s a delicate balance that, frankly, took me dozens of attempts to get right.
| Phase | Duration | Heat Level | Key Indicators |
|---|---|---|---|
| Initial Sealing | 2-3 minutes | Medium-high | Steam formation |
| Dum Cooking | 45-60 minutes | Very low | Gentle bubbling |
| Final Rest | 10-15 minutes | Off heat | Settled steam |
Understanding Regional Techniques
Different regions have developed their own approaches to biryani cooking, and I’ve had the privilege of learning from cooks across India. The Hyderabadi style focuses on the kacchi (raw) method, where raw marinated meat is layered with partially cooked rice. Lucknowi biryani uses the pakki (cooked) method, where both components are cooked separately before layering.
What’s fascinating is how these techniques developed based on local ingredients and preferences. Kolkata biryani, for instance, includes potatoes and eggs—additions that might horrify purists but create a unique and delicious variation. I’ve come to appreciate how food evolves and adapts while maintaining its essential character.
One technique I’ve found particularly useful is the “tava method”—placing the biryani pot on a cast iron griddle or tava during dum cooking. This distributes heat more evenly and prevents the bottom from burning. It’s a simple modification that dramatically improves results, especially on modern gas stoves.
The resting period after cooking is equally important. I always let my biryani rest for 10-15 minutes before opening the pot. This allows the steam to settle and the flavors to fully integrate. Opening too early can result in unevenly cooked rice and a less cohesive final dish.
Regional Variations & Modern Adaptations
One of the most beautiful aspects of biryani is how it has evolved across different regions while maintaining its essential character. I’ve been fortunate to learn from cooks representing various traditions, and each brings something unique to the table—literally and figuratively.
Hyderabadi biryani, which I consider the gold standard, uses the kacchi method with aged basmati rice and tender goat meat. The spice blend is complex but balanced, and the cooking process is almost ritualistic in its precision. Studies on traditional cooking methods show that this slow-cooking approach maximizes flavor development while maintaining nutritional value5.
Quick Regional Comparison
- Hyderabadi: Raw meat method, minimal spices, saffron-heavy
- Lucknowi: Subtle flavors, rose water, delicate spicing
- Kolkata: Includes potatoes and eggs, lighter spicing
- Malabar: Coconut influences, different rice varieties
Common Mistakes & Solutions
Let me share the mistakes I’ve made—and I’ve made plenty—so you can avoid them. The most common error I see is overcooking the rice during the initial boiling phase. Rice should be 70% cooked when you drain it, which means it should still have a slight bite. If it’s fully cooked at this stage, it’ll turn mushy during the dum process.
Another frequent mistake is insufficient heat control during dum cooking. I used to think low heat meant medium-low, but it actually means the lowest setting your stove can maintain. Too much heat will burn the bottom layer and create an unpleasant bitter taste throughout the dish.
Professional Troubleshooting Guide
| Problem | Cause | Solution | Prevention |
|---|---|---|---|
| Mushy Rice | Overcooked initially | Cook rice to 70% only | Time carefully, test frequently |
| Burnt Bottom | Heat too high | Use tava underneath | Lowest heat setting |
| Tough Meat | Insufficient marination | Marinate overnight | Use yogurt-based marinade |
| Bland Flavor | Under-seasoned layers | Season each layer | Taste and adjust gradually |
Advanced Techniques & Final Thoughts
After years of making biryani, I’ve developed some techniques that consistently improve results. One is the “steam test”—when you remove the lid after dum cooking, you should see distinct layers of steam rising. If the steam is minimal or absent, you likely need to adjust your heat control for next time.
The presentation of biryani is as important as its taste. I gently mix the layers just before serving, ensuring each portion contains rice, meat, and aromatics. The mixing should be minimal—just enough to distribute components without breaking the rice grains.
Looking ahead, I’m excited about how biryani continues to evolve. Modern techniques like sous vide cooking and precision temperature control are being adapted for biryani preparation6, while traditional methods remain the foundation of authentic flavor development.
What I find most rewarding about biryani is its ability to bring people together. It’s a dish that demands patience and respect, but rewards you with something truly special. Whether you’re making it for a special occasion or simply because you love the process, biryani represents the best of what cooking can be: a blend of tradition, technique, and personal expression.
References